
DIY Yard Drainage: Tips and Tricks for a Healthier Lawn
Summary: If you're a homeowner, you know how important it is to maintain a healthy and vibrant lawn. One of the key factors in achieving this is proper drainage. Poor drainage can lead to standing water, soil erosion, and even damage to your home's foundation. Luckily, with a few simple tools and techniques, you can easily improve your yard's drainage on your own. In this article, we'll share our expert tips and tricks for DIY yard drainage. From installing French drains to using a soil aerator, we'll cover all the basics to help you achieve a healthier, more beautiful lawn. So let's get started!
Introduction:
A healthy and vibrant lawn is a key component of any beautiful home. However, if your yard suffers from poor drainage, it can be difficult to achieve the lush greenery you desire. Standing water, soil erosion, and even damage to your home's foundation can all be caused by poor drainage. Luckily, with a few simple tools and techniques, you can improve your yard's drainage on your own with DIY yard drainage. In this article, we'll share our expert tips and tricks for achieving a healthier, more beautiful lawn.
STEP # 1. Evaluate Your Yard's Drainage Needs:
Before you begin any DIY yard drainage projects, it's important to evaluate your yard's specific drainage needs. Consider factors such as the slope of your yard, the soil composition, and the presence of any standing water. This will help you determine the best tools and techniques to use for your particular yard.
STEP # 2. Install French Drains:
One effective way to improve your yard's drainage is to install French drains. These drains consist of a perforated pipe surrounded by gravel, which is then covered with soil. They are designed to collect and redirect water away from your yard and foundation. French drains can be installed in a variety of locations, including along the perimeter of your home and in low-lying areas of your yard.
STEP # 3. Use a Soil Aerator:
Compacted soil can also contribute to poor drainage in your yard. Using a soil aerator can help alleviate this issue by loosening the soil and allowing water to flow more freely. Soil aerators come in a variety of types, including manual and gas-powered models.
STEP # 4. Create a Rain Garden:
If you're looking for a more natural way to improve your yard's drainage, consider creating a rain garden. This type of garden is designed to collect and filter rainwater, allowing it to soak into the ground slowly over time. Rain gardens can be created in low-lying areas of your yard, or anywhere where water tends to collect.
STEP # 5. Redirect Downspouts:
Another simple way to improve your yard's drainage is to redirect your downspouts. This can be done using a downspout extension, which can be attached to the end of your existing downspout to redirect water away from your home and yard.
Action # 1. Evaluate Your Yard's Drainage Needs
Assess the Slope of Your Yard The first factor to consider when evaluating your yard's drainage needs is the slope of your yard. A slope that is too steep can cause water to run off too quickly, while a slope that is too flat can cause water to pool. Ideally, your yard should have a gentle slope of about 2% to 5%. To assess your yard's slope, you can use a level and a long straightedge.
Determine the Soil Composition Another key factor to consider when evaluating your yard's drainage needs is the soil composition. Different soil types have different drainage properties, so it's important to understand what type of soil you have in your yard. Sandy soil, for example, drains more quickly than clay soil. You can determine your soil type by taking a sample and sending it to a soil testing lab.
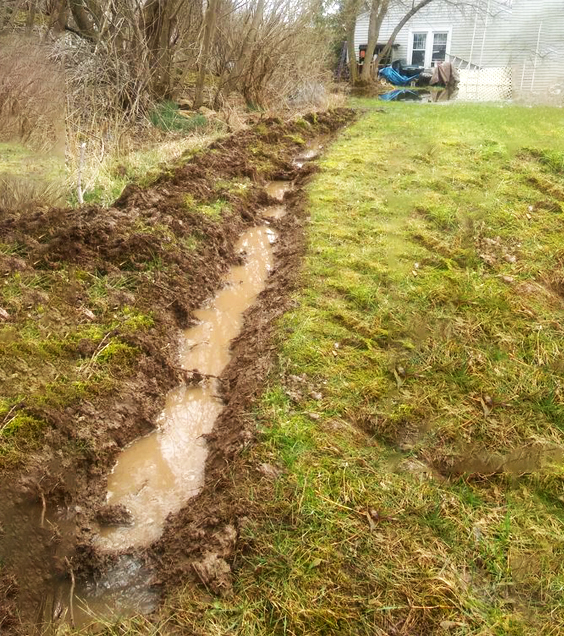
Identify the Presence of Standing Water Standing water is a clear sign that your yard has poor drainage. It's important to identify the areas in your yard where standing water tends to accumulate. This can be done by observing your yard during and after a rainfall. Once you've identified these areas, you can determine the best tools and techniques to use for DIY yard drainage.
Consider the Surrounding Landscape The landscape surrounding your yard can also affect your yard's drainage. For example, if your yard is located at the bottom of a hill, it may be more prone to flooding. It's important to consider these external factors when evaluating your yard's drainage needs.
Determining the Best Tools and Techniques for DIY Yard Drainage Once you've evaluated your yard's drainage needs, it's time to determine the best tools and techniques for DIY yard drainage. This will depend on the specific issues identified during the evaluation process. For example, if you have standing water in your yard, you may need to install a French drain or a rain garden. If your soil is compacted, you may need to use a soil aerator. By understanding your yard's specific drainage needs, you can determine the best tools and techniques for improving your yard's drainage.
Action # 2. Install French Drains
French drains are an effective way to improve yard drainage and prevent standing water. A French drain is a type of drainage system that uses a perforated pipe surrounded by gravel to redirect water away from your home's foundation. Discover the materials and tools needed for DIY French drain installation, as well as tips for ensuring your French drain is effective.
Materials and Tools Needed: To install a French drain, you will need the following materials and tools:
Perforated drain pipe, Gravel, Landscape fabric, Shovel, Wheelbarrow, Tape measure, Level, Marking paint, Gloves
Step 1: Plan Your Drainage Route The first step in installing a French drain is to plan the drainage route. This will involve identifying the areas where water tends to accumulate and determining the best route for redirecting the water. Once you've identified the drainage route, use marking paint to mark the path of the drain.
Step 2: Dig the Trench Next, use a shovel to dig a trench along the marked path. The trench should be about 18 inches deep and 8 inches wide. Use a level to ensure the trench is even along the entire length.
Step 3: Add Gravel Once the trench has been dug, add a layer of gravel to the bottom of the trench. The layer should be about 2-3 inches deep. Use a wheelbarrow to transport the gravel to the trench.
Step 4: Add the Perforated Pipe Next, lay the perforated drain pipe on top of the gravel. The pipe should be positioned with the perforations facing down. Be sure to slope the pipe slightly to ensure proper drainage.
Step 5: Cover with Gravel Once the pipe has been laid, cover it with another layer of gravel. The gravel should be about 2-3 inches deep. Be sure to fill the trench completely with gravel, leaving about 1 inch of space at the top.
Step 6: Cover with Landscape Fabric To prevent dirt and debris from entering the French drain, cover the gravel with landscape fabric. Be sure to cut the fabric to the correct length and width before laying it over the gravel.
Step 7: Backfill the Trench Once the landscape fabric has been laid, backfill the trench with soil. Use a shovel to carefully fill the trench, being sure not to disturb the French drain.
Step 8: Test the Drainage To ensure that your French drain is working properly, test it by pouring water into the trench. If the water flows smoothly through the drain, your French drain is ready to go!
Action # 3. Use a Soil Aerator
Soil aeration is a simple yet effective way to improve the health and appearance of your lawn.
Soil aeration is the process of creating small holes in your lawn's soil to improve airflow and nutrient uptake. Over time, soil can become compacted, which can prevent water and air from reaching the roots of your grass. Using a soil aerator can help to loosen the soil and improve overall soil health.
Benefits of Using a Soil Aerator:
Improved Water and Nutrient Uptake: By creating small holes in the soil, a soil aerator allows water, air, and nutrients to penetrate deep into the roots of your grass. This can help to improve overall soil health and enhance the growth and appearance of your lawn.
Reduced Soil Compaction: Over time, soil can become compacted due to foot traffic, heavy equipment, and other factors. A soil aerator can help to loosen the soil and reduce compaction, which can improve drainage and prevent standing water.
Enhanced Root Development: By allowing water, air, and nutrients to reach the roots of your grass, a soil aerator can help to enhance root development. This can lead to stronger, healthier grass that is better able to withstand drought and other environmental stresses.
Improved Overall Lawn Appearance: By improving soil health and enhancing grass growth, aeration can help to create a more vibrant and healthy-looking lawn. This can improve curb appeal and enhance the value of your property.
Tips for Using a Soil Aerator:
Timing is Important: The best time to aerate your lawn is during the growing season when your grass is actively growing. For most lawns, this means aerating in the spring or fall.
Choose the Right Type of Aerator: There are two main types of soil aerators - spike aerators and plug aerators. Spike aerators create small holes in the soil, while plug aerators remove small plugs of soil from the ground. Plug aerators are generally considered to be more effective.
Follow Proper Aeration Techniques: When using a soil aerator, be sure to follow proper techniques to achieve the best results. This may include overlapping passes, aerating in multiple directions, and using a consistent depth.
Follow Up with Proper Lawn Care: After aerating your lawn, be sure to follow up with proper lawn care techniques, such as fertilizing, watering, and mowing. This can help to enhance the benefits of aeration and improve overall lawn health.
Conclusion: Using a soil aerator is an effective way to improve soil health, enhance grass growth, and create a more vibrant lawn. By understanding the benefits of aeration and following proper techniques, you can achieve the best results for your DIY yard care project. Remember to choose the right type of aerator, follow proper techniques, and follow up with proper lawn care to enhance the benefits of aeration.
Action # 4. Create a Rain Garden
Rain gardens are a beautiful and eco-friendly way to manage stormwater runoff and create a thriving garden.
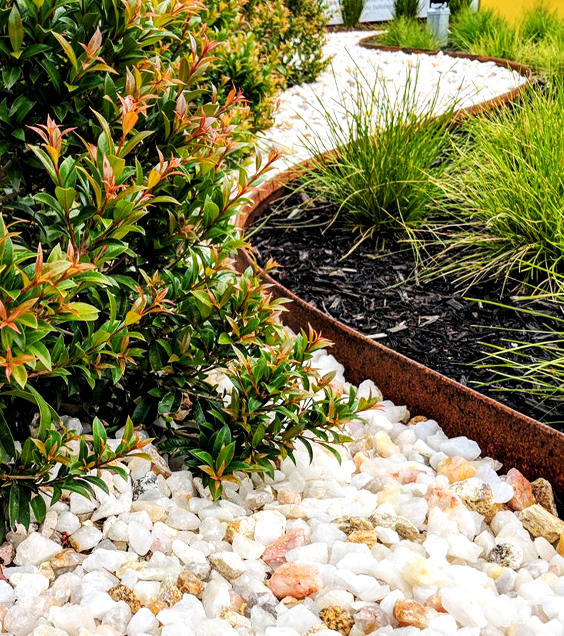
Introduction: Rain gardens are shallow depressions in your yard that are designed to collect and absorb rainwater runoff. These gardens are not only beautiful, but they also help to reduce stormwater runoff and prevent erosion. By creating a rain garden, you can enjoy a thriving garden and do your part to protect the environment.
Step 1: Choose the Right Location The first step in creating a rain garden is to choose the right location. Look for an area in your yard that receives a lot of runoff from your roof or driveway. The area should be at least 10 feet away from your home and any septic systems. Avoid areas with a high water table or where water tends to pool.
Step 2: Design Your Garden Once you've chosen your location, it's time to design your garden. Consider the size and shape of your garden, as well as the plants you want to include. You can create a rain garden in any shape or size, but it's important to make sure it's large enough to accommodate the amount of runoff in your yard.
Step 3: Dig Your Garden Now it's time to dig your garden. Start by marking the perimeter of your garden with spray paint or a garden hose. Dig a depression in the center of your garden that is at least 6 inches deep. The sides of the garden should slope gradually towards the center.
Step 4: Add Compost and Mulch After you've dug your garden, add a layer of compost to the bottom of the depression. This will help to improve soil health and provide nutrients to your plants. Add a layer of mulch on top of the compost to help retain moisture in your garden.
Step 5: Select Your Plants Choosing the right plants is essential for a thriving rain garden. Look for plants that are native to your area and can tolerate wet soil conditions. Some good options include wildflowers, grasses, and sedges. Be sure to choose a variety of plants to provide diversity and interest in your garden.
Step 6: Plant Your Garden Once you've selected your plants, it's time to plant your garden. Start by planting the larger plants first and then fill in with smaller plants. Be sure to space your plants appropriately to allow for growth.
Step 7: Maintain Your Garden Maintaining your rain garden is important to ensure it thrives. Be sure to water your garden regularly, especially during dry spells. Remove any weeds that may appear and add additional mulch as needed. It's also a good idea to test the soil periodically to ensure it remains healthy.
Conclusion: Creating a rain garden is a beautiful and eco-friendly way to manage stormwater runoff and create a thriving garden. By choosing the right location, designing your garden, selecting the right plants, and maintaining your garden, you can enjoy a beautiful and sustainable addition to your yard.
Action # 5. Redirect Downspouts
Redirecting downspouts is a simple and effective way to manage rainwater runoff and prevent erosion.
Downspouts are an essential component of your home's gutter system. They are responsible for directing rainwater away from your home and preventing damage to your foundation. However, if your downspouts are not properly directed, they can cause erosion and other problems in your landscape. By redirecting your downspouts, you can manage rainwater runoff and prevent damage to your property.
Step 1: Evaluate Your Landscape The first step in redirecting your downspouts is to evaluate your landscape. Look for areas that are prone to erosion or flooding and identify potential locations for redirecting your downspouts.
Step 2: Choose the Right Location Once you've evaluated your landscape, it's time to choose the right location for your downspout. Look for an area that is at least 10 feet away from your home's foundation and slopes away from your home. You can also consider redirecting your downspout to a rain garden or other type of landscaping feature.
Step 3: Dig a Trench After you've chosen your location, it's time to dig a trench. Start by marking the path of the trench with spray paint or a garden hose. Dig a trench that is at least 6 inches deep and 8-12 inches wide.
Step 4: Install a Drainage Pipe Next, install a drainage pipe in your trench. The pipe should be sloped away from your home and towards your desired location for runoff. Use a level to ensure the proper slope.
Step 5: Cover the Pipe After you've installed your drainage pipe, it's time to cover it with soil. Fill in the trench with soil and pack it down to ensure proper drainage.
Step 6: Test Your Drainage Finally, it's important to test your drainage to ensure that it's working properly. Use a garden hose to simulate rainfall and observe how the water flows through your downspout and into the drainage pipe. Make adjustments as needed to ensure proper drainage.
Redirecting your downspouts is a simple and effective way to manage rainwater runoff and prevent damage to your landscape. By evaluating your landscape, choosing the right location, digging a trench, installing a drainage pipe, covering the pipe, and testing your drainage, you can redirect your downspouts and improve the health and appearance of your landscape.
Conclusion:
Improving your yard's drainage doesn't have to be a difficult or expensive task. By following these simple tips and techniques for DIY yard drainage, you can achieve a healthier, more vibrant lawn in no time. Remember to evaluate your yard's specific drainage needs, and use the appropriate tools and techniques for your particular situation. With a little effort and know-how, you'll be enjoying a beautiful, healthy lawn in no time.
Top 10 Companies for DIY Yard Discounted Drainage Products in the US:
-
NDS - NDS is a leading manufacturer of drainage solutions, including yard drainage products such as channel drains, catch basins, and pop-up emitters.
-
Flex-Drain - Flex-Drain offers a wide range of flexible drainage products for residential and commercial use, including flexible downspout extensions and corrugated pipes.
-
Advanced Drainage Systems - Advanced Drainage Systems is a leading manufacturer of high-quality drainage products, including yard drainage solutions such as catch basins and French drains.
-
Rain Bird - Rain Bird offers a range of irrigation and drainage products, including catch basins, drain grates, and drain boxes.
-
US TRENCH DRAIN - US TRENCH DRAIN specializes in trench drains and offers a variety of drainage solutions for yards, driveways, and commercial properties.
-
Aquabarrel - Aquabarrel offers rain barrels, downspout filters, and other eco-friendly drainage products for residential use.
-
The Drainage Products Store - The Drainage Products Store offers a wide range of drainage products for DIY yard drainage, including French drains, catch basins, and pop-up emitters.
-
Zurn - Zurn is a leading manufacturer of drainage products, including trench drains and catch basins for residential and commercial use.
-
Sioux Chief - Sioux Chief offers a variety of drainage solutions, including catch basins, drainage grates, and channel drains.
-
Easy Drain - Easy Drain offers a range of drainage products for bathrooms, outdoor areas, and commercial properties, including shower drains and trench drains.
Top 10 Companies for DIY Yard Cheap Drainage Products in the UK:
-
Drainage Superstore - Drainage Superstore offers a wide range of drainage products, including yard drainage solutions such as French drains and soakaway crates.
-
Clark-Drain - Clark-Drain offers a variety of drainage products, including channel drains, manhole covers, and sump pumps.
-
ACO - ACO offers a range of drainage solutions for residential and commercial use, including channel drains, catch basins, and slot drains.
-
Polypipe - Polypipe offers a wide range of drainage products, including yard drainage solutions such as soakaway crates and channel drains.
-
EasyMerchant - EasyMerchant offers a variety of drainage products for residential and commercial use, including French drains and slot drains.
-
Build Plumb Plastics - Build Plumb Plastics specializes in drainage solutions and offers a range of products, including yard drainage solutions such as soakaway crates and channel drains.
-
Plastics Express - Plastics Express offers a range of drainage products, including yard drainage solutions such as soakaway crates and channel drains.
-
Drainage Central - Drainage Central offers a variety of drainage products for residential and commercial use, including French drains and slot drains.
-
JDP - JDP offers a wide range of drainage solutions, including channel drains, catch basins, and slot drains for residential and commercial use.
-
Alumasc Water Management Solutions - Alumasc Water Management Solutions specializes in sustainable drainage solutions and offers a range of products, including channel drains and slot drains.
Top 12 Companies for DIY Yard Discounted Drainage Products in Germany:
-
ACO - ACO offers a range of drainage solutions for residential and commercial use, including channel drains, catch basins, and slot drains.
-
Hauraton - Hauraton offers a variety of drainage products, including yard drainage solutions such as trench drains, catch basins, and slot channels.
-
Emscherbau - Emscherbau specializes in drainage solutions for outdoor areas, including trench drains, catch basins, and slot channels.
-
KESSEL - KESSEL offers a wide range of drainage solutions for both residential and commercial use, including shower drains, channel drains, and catch basins.
-
Aquatec - Aquatec offers a variety of drainage products, including channel drains, catch basins, and slot channels for both indoor and outdoor use.
-
Heba - Heba specializes in trench drains and offers a range of drainage solutions for residential and commercial use.
-
Dallmer - Dallmer offers a wide range of drainage products, including shower drains, channel drains, and catch basins for both indoor and outdoor use.
-
Mea Group - Mea Group offers a variety of drainage products, including yard drainage solutions such as French drains and trench drains.
-
BIRCO - BIRCO offers a range of drainage solutions for outdoor areas, including trench drains, catch basins, and slot channels.
-
AWADOCK - AWADOCK specializes in trench drains and offers a variety of drainage solutions for both residential and commercial use.
-
Rehau - Rehau offers a variety of drainage products, including channel drains, catch basins, and slot drains for residential and commercial use.
-
Alutec - Alutec offers a range of drainage solutions for residential and commercial use, including channel drains, catch basins
Related Post


Subscribe to our weekly newsletter!
Get coupons from your favorite retailers sent to your inbox at the beginning of every week.
You can cancel anytime.
Comment
leave comment